
How does Webflow’s bulk image compression work?
Two separate tools. Most people only know about the first.
Site assets. Assets panel, expand it, select assets or Select all, choose AVIF or WebP, click Compress.
CMS assets. Collections panel, more options icon, Compress assets, choose AVIF or WebP, click Compress.
Both take JPEG, JPG and PNG as input. Both produce AVIF or WebP. Both replace the original asset in the Assets panel and everywhere it appears on the canvas. Both are lossy only.
There is a throughput cap: 100 assets per request, 10 requests per minute, and Webflow recommends converting very large images individually.
The compression itself is good. AVIF in particular gets meaningful reductions on photographic content. The problem is not the compression. The problem is what you are forced to accept alongside it.
Limit one: you can’t compress without converting
There is no option to reduce file size while keeping PNG as PNG or JPEG as JPEG. Webflow’s compression tool is a format conversion tool. The button says Compress and the outcome is an AVIF or WebP file.
For most images that is fine, and often better than fine. AVIF is genuinely excellent.
It stops being fine in three situations.
Open Graph images. Webflow’s own documentation is unambiguous: AVIF and WebP are not supported for Open Graph images, and Webflow strongly recommends against compressing OpenGraph images into either format. Convert them and your link previews degrade or vanish across LinkedIn, Slack, WhatsApp and most email clients.
Small flat-colour images. AVIF’s advantage lives on large photographic content. On a 200px logo or a flat-colour icon, AVIF’s container overhead often is not earned back, and a palette-quantised 8-bit PNG can produce a smaller file. Webflow’s own documentation notes AVIF may not compress non-photographic images as well as PNG or lossless WebP.
Anything you might need to reverse. You cannot convert an AVIF or WebP back to its original format in Webflow. Originals are replaced. The documented recovery path is restoring a site backup from before the conversion. If you did not download the source files first, that is your only option.
So the coupling matters. On a field where you want smaller files but need to stay JPEG, Webflow offers you nothing.
Limit two: no field scoping on CMS collections
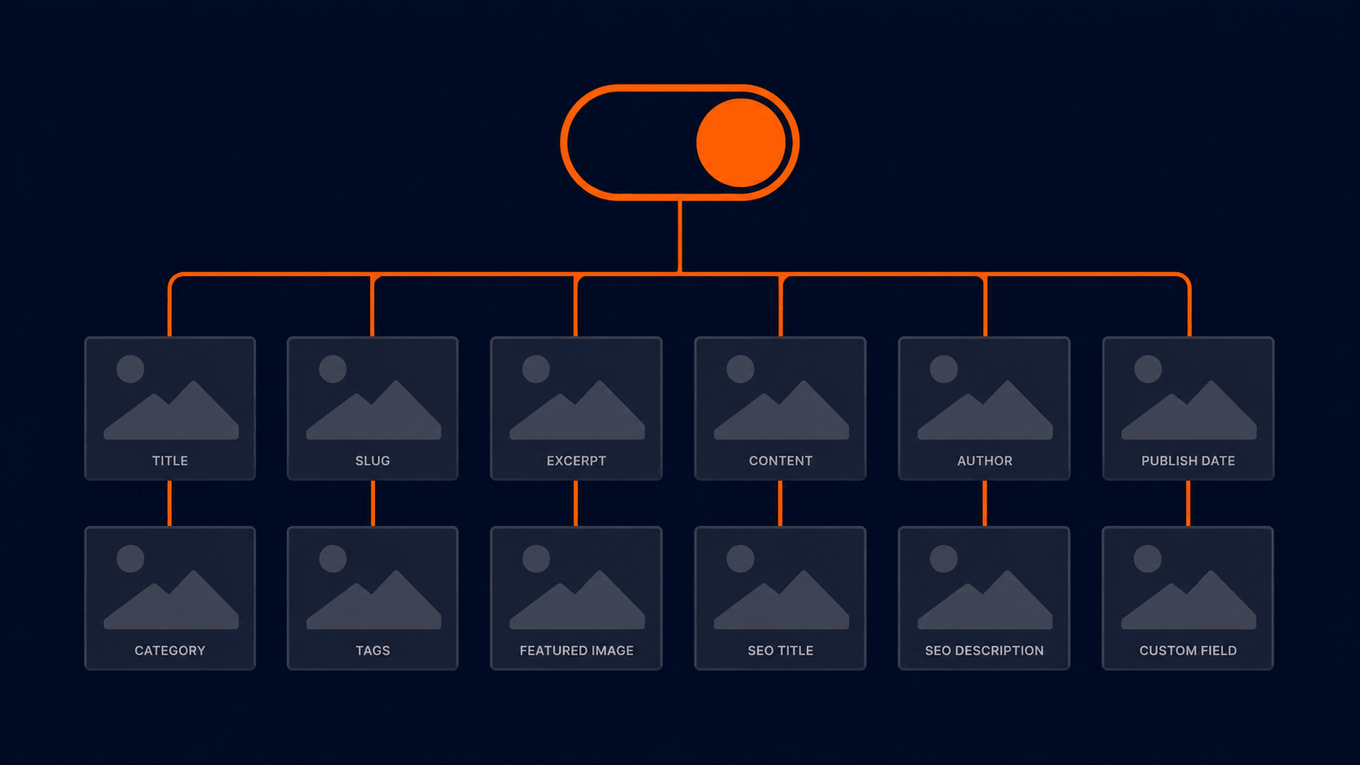
The CMS route converts all assets in your CMS Collections. Every field, every collection, one action.
Consider a normal Webflow blog:
| Field | What it does | Want to convert? |
|---|---|---|
| Featured image | Card thumbnail, article header, and og:image | No, breaks link previews |
| Inline body images | Article content | Yes |
| Author photo | Byline avatar | Yes |
| Client logos (separate collection) | Flat-colour SVG and PNG | SVG skipped, PNG questionable |
You want three of these converted and one protected. Webflow gives you one button that does all of them.
There is no target file size, no quality setting, no per-collection selection, no exclusion list. You choose a format and Webflow decides everything else.
Why these two limits compound
Individually each limit is an inconvenience. Together they produce a dead end.
- Your blog’s featured image field feeds og:image. This is the default setup on almost every Webflow blog and template.
- Webflow says do not convert Open Graph images to AVIF or WebP.
- Compression is only available as conversion to AVIF or WebP.
- The CMS tool cannot exclude that field.
Therefore: on the collection where images are heaviest and most numerous, the native CMS compression tool cannot be used safely at all.
Not "use it carefully." Cannot be used, unless you are willing to break social previews on every post you have ever published, or unless your og:image is sourced from a separate field that most sites do not have.
This is the gap. It is why a scripted alternative exists, and it is the part that no existing article on Webflow image compression states plainly.
The workaround inside Webflow, if you want to stay native: add a dedicated og:image field to the collection, populate it with unconverted JPEGs, point your Open Graph settings at it, and only then run the compression tool. That is real work across every existing item, but it is a legitimate path and worth knowing before you reach for code.
A secondary limit: it converts format, not dimensions
Worth stating separately because it is often the larger problem and it is invisible in the file size number.
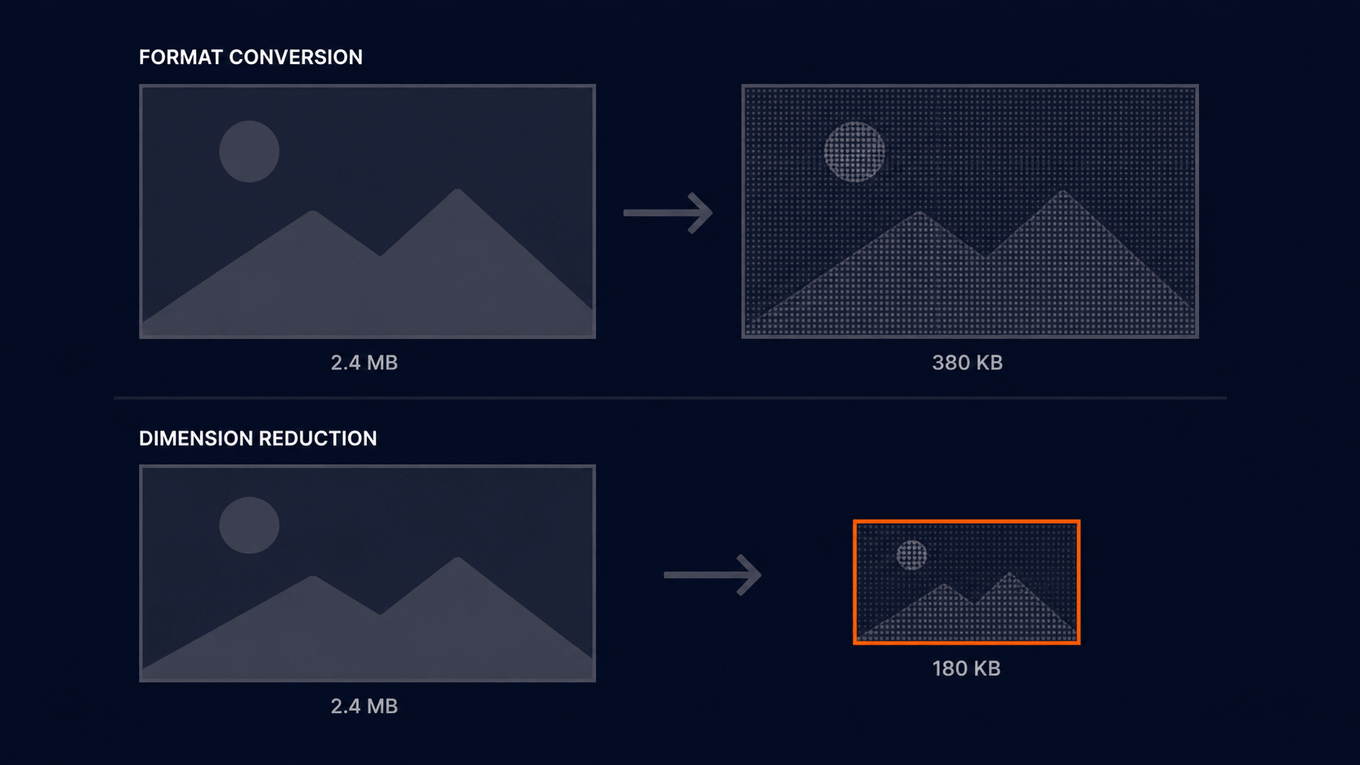
Format conversion re-encodes the same pixels more efficiently. It does not change how many pixels there are. A 4000px photo dropped into a field that renders as a 400px card thumbnail might go from 3 MB to 600 KB as AVIF. Real improvement. Still ten times more image than the layout will ever display, still decoded at full resolution by the browser.
In the run documented below, the median source image was 852 KB and the largest was 3.1 MB in a thumbnail field. Those are dimension problems wearing a file size costume, and no format conversion tool will fix them.
Webflow’s own troubleshooting note reflects the ceiling here: if an asset fails to convert, it may already be compressed as much as possible. Format conversion has a floor, and dimension waste sits below it.
Native tool or API script?
| Native compress | Data API script | Third-party optimiser | |
|---|---|---|---|
| Reduces file size | Yes, often substantially | Yes | Yes |
| Keeps original format | No, converts to AVIF or WebP | Yes | Usually optional |
| Changes pixel dimensions | No | Yes, resizes to render width | Usually yes |
| Target file size | No control | Explicit, per field | Varies |
| Scope | All fields, all collections | One field, one collection | Varies |
| Safe on Open Graph fields | No, per Webflow docs | Yes | Depends on settings |
| Reversible | No, backup restore only | Yes, original asset persists | Varies |
| Responsive variants (srcset) | Preserved | Lost | Lost, same API path |
| Reporting | None | Full CSV log | Dashboard, usually |
| Throughput | 100 assets per request, 10 requests/min | Bounded by API rate limit | Plan-dependent |
| Cost | Included in your Webflow plan | Free. Node and sharp are open source | Per-image or monthly |
| Where it runs | Webflow’s servers | Your own machine | Vendor’s servers |
| Who sees your images | Webflow | Nobody new | Webflow plus the vendor |
| Effort | Two clicks | An hour of setup | Sign up and configure |
Three rows there deserve more than a table cell.
Cost. The script is free in the sense that matters: no subscription, no per-image pricing, no seat. sharp is open source, Node is free, and the only ongoing cost is your Webflow plan, which you already pay. The native tool is also included, so free is not what separates these two. It is what separates both of them from the paid optimiser most people reach for third.
Where it runs. The script runs on your laptop. Images download from Webflow, get processed locally, and upload back. Nothing is queued on someone else’s infrastructure, so there is no vendor rate limit, no job backlog, no service to go down mid-run, and nothing to renew. Run it again in eight months and it still works, because the only dependencies are Node and a library you already have.
Who sees your images. Nothing leaves your machine except to and from Webflow. On client work this is occasionally not a preference but a contractual requirement, and it is the cleanest argument against routing an entire CMS library through a third-party optimiser you will need to justify in a security review.
Use the native tool when: your images are at sensible dimensions, the collection has no og:image dependency (or you have separated it into its own field), and you want modern-format savings across the board. This is the right answer more often than developers like to admit. Two clicks beats an hour of scripting.
Use the API when: you need to protect a specific field, keep a format, hit a file size target, fix oversized dimensions, or produce a record of what changed. It costs nothing beyond an hour of setup and it runs entirely on your own machine.
Use a paid optimiser when: you want images optimised continuously as editors upload them, rather than as a one-time cleanup. That is the one thing neither option above does. A script is a batch job, and the native tool is a manual action, so both leave you re-running the cleanup every few months as a client fills the CMS with camera-resolution photos.
Use neither when: the images are heroes or full-width galleries and you are considering the API. See below.
Why does the API route lose responsive images?
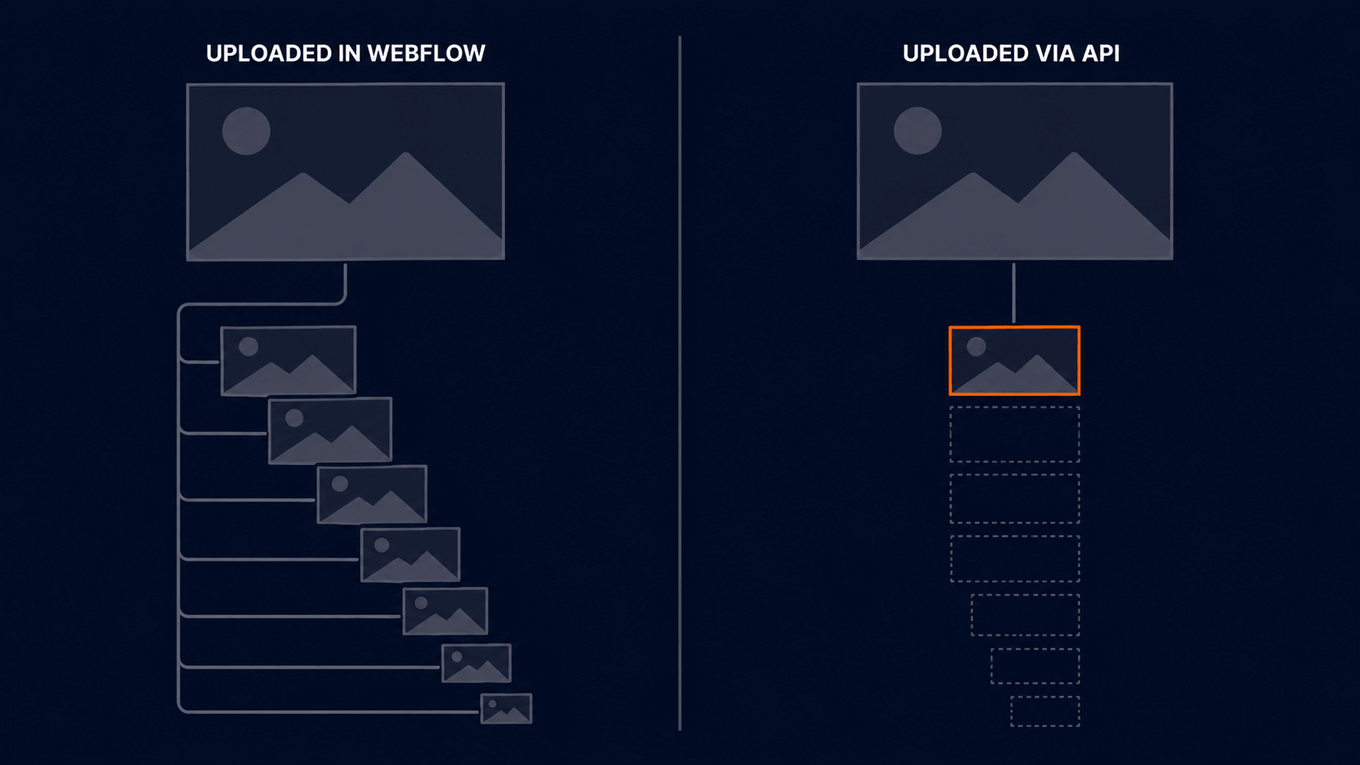
Webflow only generates variants for uploads that pass through Webflow.
Its help documentation is explicit: srcset and sizes variants are created only for images uploaded directly through the Assets panel or a CMS image field. Images added via CSV import or the API do not get variants. Normally Webflow generates up to seven variants from 3200px down to 500px and lets the browser choose. Via the API you get one file, served at every viewport.
The native tool does not have this problem, since conversion happens inside Webflow. That is a genuine point in its favour and the main reason not to script by reflex.
Losing variants is survivable only where render width is fixed and known:
| Image type | API script safe? | Why |
|---|---|---|
| Card thumbnails | Yes | Bounded render width, often under 800px |
| Partner and client logos | Yes | Fixed small size, flat colour |
| Author avatars | Yes | Tiny, fixed, usually cropped circular |
| Category and tag icons | Yes | Small and static |
| Full-width hero images | No | Renders 400px to 2560px. Losing srcset costs more than compression saves |
| Portfolio and gallery images | No | Users zoom, variable render width |
The rule: if you cannot state the maximum pixel width the image renders at, do not run the script on it.
Real results: 341 CMS items via the API
One production run against a blog collection’s thumbnail field. Identifying data stripped. Configuration: 100 KB target, format-preserving, compress first and resize down only if still over target.
| Metric | Value |
|---|---|
| CMS items scanned | 341 |
| Images processed | 164 |
| Already under threshold, skipped | 171 |
| Skipped because output grew larger | 4 |
| Items with no image | 2 |
| Total size before | 161.4 MB |
| Total size after | 14.3 MB |
| Saved | 147.1 MB (91.1%) |
| Median image before | 852 KB |
| Median image after | 88 KB |
| Largest single image | 3.1 MB |
| Median per-item reduction | 89.8% |
| Run duration | 10.7 minutes |
Three observations.
Most of that 91% is resizing, not compression. 852 KB to 88 KB on a thumbnail is not a format-conversion outcome. AVIF would have made real gains here and left most of the waste in place, because the waste was pixels.
Half the collection needed nothing. 171 of 341 images were already under threshold and skipped without a write. A script that does not check before acting burns quota and creates duplicate assets for nothing.
Four images got bigger. Sources of 112 KB to 118 KB came out at 141 KB to 224 KB. Already-efficient files where re-encoding added bytes rather than removing them. A three-line guard caught all four: if the optimised buffer is not smaller than the original, the script returns without uploading and logs it as skipped-no-improvement.
Almost every tutorial omits that check. Without it, that run ships four regressions and quietly makes the site slower. Webflow’s native tool has equivalent behaviour, refusing assets it cannot improve, but it does not tell you which ones.
Before you start: the three things you need
The script needs three credentials and one field name. Getting these wrong is where most people lose their first ten minutes.
1. An API token with the right scopes
Site settings, then the Apps and integrations tab, then generate a new API token. Four scopes are required:
| Scope | Why |
|---|---|
| cms:read | List collection items |
| cms:write | Re-point the image field |
| assets:read | Read existing asset data |
| assets:write | Upload the optimised file |
A token missing assets:write fails at the upload step, after downloading and compressing everything, which is a slow way to find out. Check the scopes before you run.
Never put the token in the file. Pass it as an environment variable at run time. A token in a script is a token in your shell history, your clipboard, and eventually your repo.
2 and 3. Your Site ID and Collection ID
Both are 24-character alphanumeric strings.
Site ID. The most reliable way to find it does not involve the settings UI at all, which has moved between Webflow releases. Open any image in your Assets panel and copy its URL. Webflow asset URLs are structured as cdn.prod.website-files.com/{site-id}/{asset-id}_filename.png. The first segment after the domain is your Site ID. It is also shown in site settings.
Collection ID. Open the CMS panel, go into the collection’s settings, and it appears there. If you cannot find it, a GET request to /v2/sites/{site_id}/collections returns every collection with its ID.
The image field slug. This is the fourth thing you need, and the one nobody mentions until it breaks. The slug is not the display name. A field shown as "Featured Image" in the Designer might be featured-image, thumbnail, or main-image, depending on what it was called when it was first created and whether it was renamed later. Open the field’s settings in the collection editor to see its actual slug.
Get this wrong and the script runs to completion, reports no errors, and silently skips every item, because item.fieldData['wrong-slug'] is simply undefined. If your first dry run reports every item as skipped-no-image, this is why.
The full script
Copy this whole file. Only the first block needs changing.
/**
 * Bulk-optimize Webflow CMS images via the Data API.
 *
 * Format-preserving: PNG stays PNG, JPEG stays JPEG. Everything else is skipped.
 * Compresses first at MAX_WIDTH, then resizes down only if still over target.
 *
 * Requirements: Node 18+, then: npm i sharp form-data node-fetch@2
 * Run:          WEBFLOW_TOKEN=your_token node optimize-cms-images.js
 */

const fetch = require('node-fetch');
const sharp = require('sharp');
const FormData = require('form-data');
const crypto = require('crypto');
const fs = require('fs');
const path = require('path');

// ============================================================
//  CHANGE THESE FOUR VALUES. NOTHING ELSE IS REQUIRED.
// ============================================================

const SITE_ID = 'PASTE_YOUR_SITE_ID';
const COLLECTION_ID = 'PASTE_YOUR_COLLECTION_ID';
const IMAGE_FIELD_SLUG = 'PASTE_YOUR_FIELD_SLUG'; // e.g. 'thumbnail', 'main-image'
const WEBFLOW_TOKEN = process.env.WEBFLOW_TOKEN;  // set as an env var, never hardcode

// ============================================================
//  SAFETY SETTINGS. START HERE, LOOSEN LATER.
// ============================================================

const DRY_RUN = true;        // true = nothing is uploaded. Previews saved locally.
const TOTAL_ITEM_LIMIT = 20; // 0 = process everything. Start at 20.

// ============================================================
//  TUNING. DEFAULTS ARE SENSIBLE FOR CARD THUMBNAILS.
// ============================================================

const MAX_WIDTH = 800;   // Set to the MEASURED render width of this field. Do not guess.
const MIN_WIDTH = 300;   // Floor. Below this, give up and flag for manual review.
const SIZE_THRESHOLD_BYTES = 100 * 1024; // Target file size.

const PNG_USE_PALETTE = true; // 8-bit quantization. Great for flat colour, bands on photos.
const JPEG_QUALITY_START = 88;
const JPEG_QUALITY_MIN = 60;
const JPEG_QUALITY_STEP = 5;
const RESIZE_STEP = 0.85;
const MAX_ATTEMPTS = 8;

const CONCURRENCY = 3;
const DELAY_MS = 350;
const BATCH_SIZE = 30;
const PAUSE_BETWEEN_BATCHES_MS = 5000;

const CSV_LOG_PATH = './image-optimization-log.csv';
const DRY_RUN_OUTPUT_DIR = './dry-run-previews';

// ============================================================
//  BELOW THIS LINE: NO CHANGES NEEDED.
// ============================================================

const API = 'https://api.webflow.com/v2';
const headers = {
  Authorization: `Bearer ${WEBFLOW_TOKEN}`,
  'Content-Type': 'application/json',
  accept: 'application/json',
};

const sleep = (ms) => new Promise((r) => setTimeout(r, ms));

// ---------- Rate limit backoff ----------
// Webflow allows 60 requests per minute per token. Read the headers it returns
// and slow down before getting a 429 rather than after.
async function respectRateLimit(res) {
  const remaining = Number(res.headers.get('x-ratelimit-remaining'));
  if (!Number.isNaN(remaining) && remaining < 10) {
    // Jitter so parallel workers do not resume in lockstep.
    await sleep(5000 + Math.random() * 2000);
  }
}

async function webflowFetch(url, options = {}, retries = 3) {
  for (let attempt = 0; attempt <= retries; attempt++) {
    const res = await fetch(url, { headers, ...options });
    if (res.status === 429) {
      const wait = (attempt + 1) * 5000 + Math.random() * 2000;
      console.warn(`  rate limited, waiting ${Math.round(wait / 1000)}s`);
      await sleep(wait);
      continue;
    }
    await respectRateLimit(res);
    return res;
  }
  throw new Error('Still rate limited after retries');
}

// ---------- CSV logging ----------
const CSV_HEADERS = [
  'itemId', 'itemName', 'slug', 'status', 'originalFormat',
  'originalSizeKB', 'optimizedSizeKB', 'newAssetId', 'notes', 'timestamp',
];

function csvEscape(value) {
  const str = String(value ?? '');
  return /[",\n]/.test(str) ? '"' + str.replace(/"/g, '""') + '"' : str;
}

function logToCsv(row) {
  if (!fs.existsSync(CSV_LOG_PATH)) {
    fs.writeFileSync(CSV_LOG_PATH, CSV_HEADERS.join(',') + '\n');
  }
  fs.appendFileSync(CSV_LOG_PATH, CSV_HEADERS.map((h) => csvEscape(row[h])).join(',') + '\n');
}

// ---------- 1. Fetch all CMS items ----------
async function getAllItems() {
  let items = [];
  let offset = 0;
  const limit = 100;

  while (true) {
    const res = await webflowFetch(
      `${API}/collections/${COLLECTION_ID}/items?limit=${limit}&offset=${offset}`
    );
    if (!res.ok) throw new Error(`List items failed: ${res.status} ${await res.text()}`);
    const data = await res.json();
    items = items.concat(data.items);
    if (data.items.length < limit) break;
    offset += limit;
    await sleep(DELAY_MS);
  }
  return items;
}

// ---------- 2. Download ----------
async function downloadImage(url) {
  const res = await fetch(url);
  if (!res.ok) throw new Error(`Download failed: ${res.status}`);
  return Buffer.from(await res.arrayBuffer());
}

// ---------- 3. Optimize, preserving format ----------
async function optimizeImage(buffer, format) {
  let width = MAX_WIDTH;
  let quality = JPEG_QUALITY_START;
  let output;

  for (let attempt = 0; attempt < MAX_ATTEMPTS; attempt++) {
    let pipeline = sharp(buffer).resize({ width, withoutEnlargement: true });

    if (format === 'png') {
      pipeline = pipeline.png({
        compressionLevel: 9,
        effort: 10,
        palette: PNG_USE_PALETTE,
        quality: 90,
        dither: 0,
      });
    } else {
      pipeline = pipeline.jpeg({ quality, mozjpeg: true });
    }

    output = await pipeline.toBuffer();
    if (output.length <= SIZE_THRESHOLD_BYTES) break;

    // Drop JPEG quality before losing pixels. Cheaper visually.
    if (format === 'jpeg' && quality > JPEG_QUALITY_MIN) {
      quality = Math.max(quality - JPEG_QUALITY_STEP, JPEG_QUALITY_MIN);
      continue;
    }
    if (width <= MIN_WIDTH) break;
    width = Math.max(Math.round(width * RESIZE_STEP), MIN_WIDTH);
  }

  return output;
}

// ---------- 4. Upload as a new asset ----------
async function uploadAsset(buffer, fileName) {
  const fileHash = crypto.createHash('md5').update(buffer).digest('hex');

  const registerRes = await webflowFetch(`${API}/sites/${SITE_ID}/assets`, {
    method: 'POST',
    body: JSON.stringify({ fileName, fileHash }),
  });
  if (!registerRes.ok) throw new Error(`Asset register failed: ${await registerRes.text()}`);

  const { uploadUrl, uploadDetails, hostedUrl, id } = await registerRes.json();

  const form = new FormData();
  Object.entries(uploadDetails).forEach(([k, v]) => form.append(k, v));
  form.append('file', buffer, fileName);

  const s3Res = await fetch(uploadUrl, { method: 'POST', body: form });
  if (!s3Res.ok && s3Res.status !== 204) {
    throw new Error(`S3 upload failed: ${s3Res.status}`);
  }

  return { assetId: id, hostedUrl };
}

// ---------- 5. Re-point the CMS field ----------
async function patchItemImage(itemId, assetId, hostedUrl, alt) {
  const res = await webflowFetch(`${API}/collections/${COLLECTION_ID}/items/${itemId}`, {
    method: 'PATCH',
    body: JSON.stringify({
      fieldData: {
        [IMAGE_FIELD_SLUG]: { fileId: assetId, url: hostedUrl, alt: alt || null },
      },
    }),
  });
  if (!res.ok) throw new Error(`Patch failed: ${await res.text()}`);
  return res.json();
}

// ---------- Per-item runner ----------
async function processItem(item) {
  const field = item.fieldData[IMAGE_FIELD_SLUG];
  const itemName = item.fieldData.name || '';
  const slug = item.fieldData.slug || '';
  const timestamp = new Date().toISOString();
  const base = { itemId: item.id, itemName, slug, timestamp };

  if (!field || !field.url) {
    logToCsv({ ...base, status: 'skipped-no-image' });
    return null;
  }

  try {
    const original = await downloadImage(field.url);

    // Detect format from the bytes, not the URL extension. Extensions lie.
    const metadata = await sharp(original).metadata();
    const format = metadata.format;
    const kb = (b) => (b / 1024).toFixed(0);

    if (format !== 'png' && format !== 'jpeg') {
      // SVG is vector. WebP and GIF are already efficient or animated.
      console.log(`- skip (${format}): ${itemName}`);
      logToCsv({ ...base, status: 'skipped-unsupported-format', originalFormat: format,
                 originalSizeKB: kb(original.length) });
      return null;
    }

    if (original.length <= SIZE_THRESHOLD_BYTES) {
      console.log(`- skip (already ${kb(original.length)}KB): ${itemName}`);
      logToCsv({ ...base, status: 'skipped-already-small', originalFormat: format,
                 originalSizeKB: kb(original.length) });
      return null;
    }

    const optimized = await optimizeImage(original, format);

    // Guard: re-encoding can make an already-efficient file larger.
    if (optimized.length >= original.length) {
      console.log(`- skip (output was larger): ${itemName}`);
      logToCsv({ ...base, status: 'skipped-no-improvement', originalFormat: format,
                 originalSizeKB: kb(original.length), optimizedSizeKB: kb(optimized.length),
                 notes: 'optimized output was not smaller than original' });
      return null;
    }

    const stillOver = optimized.length > SIZE_THRESHOLD_BYTES;
    const ext = format === 'png' ? 'png' : 'jpg';
    const note = stillOver ? 'still over target at MIN_WIDTH' : '';

    if (DRY_RUN) {
      if (!fs.existsSync(DRY_RUN_OUTPUT_DIR)) fs.mkdirSync(DRY_RUN_OUTPUT_DIR, { recursive: true });
      const previewPath = path.join(DRY_RUN_OUTPUT_DIR, `${item.id}.${ext}`);
      fs.writeFileSync(previewPath, optimized);
      console.log(`[DRY RUN] ${kb(original.length)}KB -> ${kb(optimized.length)}KB : ${itemName}`);
      logToCsv({ ...base, status: 'dry-run', originalFormat: format,
                 originalSizeKB: kb(original.length), optimizedSizeKB: kb(optimized.length),
                 notes: note });
      return null;
    }

    const fileName = `${slug || item.id}-${Date.now()}.${ext}`;
    const { assetId, hostedUrl } = await uploadAsset(optimized, fileName);
    await patchItemImage(item.id, assetId, hostedUrl, field.alt);

    console.log(`OK ${kb(original.length)}KB -> ${kb(optimized.length)}KB : ${itemName}`);
    logToCsv({ ...base, status: 'updated', originalFormat: format,
               originalSizeKB: kb(original.length), optimizedSizeKB: kb(optimized.length),
               newAssetId: assetId, notes: note });
    return item.id;
  } catch (err) {
    console.error(`FAIL ${itemName}: ${err.message}`);
    logToCsv({ ...base, status: 'error', notes: err.message });
    return null;
  }
}

// ---------- Main ----------
async function run() {
  if (!WEBFLOW_TOKEN) throw new Error('Set WEBFLOW_TOKEN as an environment variable');
  if (SITE_ID.startsWith('PASTE_')) throw new Error('Set SITE_ID');
  if (COLLECTION_ID.startsWith('PASTE_')) throw new Error('Set COLLECTION_ID');
  if (IMAGE_FIELD_SLUG.startsWith('PASTE_')) throw new Error('Set IMAGE_FIELD_SLUG');

  const allItems = await getAllItems();
  console.log(`Found ${allItems.length} items in collection`);

  const items = TOTAL_ITEM_LIMIT > 0 ? allItems.slice(0, TOTAL_ITEM_LIMIT) : allItems;
  if (TOTAL_ITEM_LIMIT > 0) console.log(`Limited to first ${items.length} items`);
  if (DRY_RUN) console.log('DRY RUN: nothing will be uploaded to Webflow\n');

  const updated = [];
  let batchNum = 0;

  for (let start = 0; start < items.length; start += BATCH_SIZE) {
    batchNum++;
    const batch = items.slice(start, start + BATCH_SIZE);
    console.log(`\n--- Batch ${batchNum}: ${start + 1}-${start + batch.length} of ${items.length} ---`);

    const queue = [...batch];
    async function worker() {
      while (queue.length) {
        const id = await processItem(queue.shift());
        if (id) updated.push(id);
        await sleep(DELAY_MS);
      }
    }
    await Promise.all(Array.from({ length: CONCURRENCY }, worker));

    if (start + BATCH_SIZE < items.length) await sleep(PAUSE_BETWEEN_BATCHES_MS);
  }

  console.log(`\nDone. Log written to ${CSV_LOG_PATH}`);
  if (DRY_RUN) {
    console.log(`Previews in ${DRY_RUN_OUTPUT_DIR}. Open some and check them.`);
    console.log('When happy: set DRY_RUN = false, keep TOTAL_ITEM_LIMIT = 20 for the first live run.');
  } else {
    console.log(`Updated ${updated.length} items. Changes are STAGED, not published.`);
    console.log('Review in the Designer, then publish manually.');
  }
}

run().catch((err) => {
  console.error(err.message);
  process.exit(1);
});
Running it
npm i sharp form-data node-fetch@2
WEBFLOW_TOKEN=your_token node optimize-cms-images.js
It ships with DRY_RUN = true and TOTAL_ITEM_LIMIT = 20, so the first run touches nothing. It writes twenty compressed previews to ./dry-run-previews and a CSV log alongside them. Open the previews and look at them, because compression artefacts are obvious to a human and invisible to a script.
Then set DRY_RUN = false and run again, still capped at 20. Publish, check the site, and only then set TOTAL_ITEM_LIMIT = 0.
How the script works, step by step
The walkthrough below explains the parts that matter. Skip it if the code is self-evident to you.
Fetching every CMS item
The Data API paginates at 100 items per request, so getAllItems() loops with an increasing offset until a page comes back short. On a 341-item collection that is four requests.
Detecting the real format from the bytes
Do not trust the URL extension. Webflow asset URLs misreport format more often than you would expect, usually because a file was renamed somewhere in its history. sharp(buffer).metadata() reads the actual bytes.
Anything that is not PNG or JPEG gets skipped. SVG is vector, so rasterising it would be vandalism. WebP and GIF are already efficient or animated. This one check is the difference between a working script and one that turns your SVG logos into blurry raster files.
Compressing first, resizing only if necessary
Order matters. Resizing is destructive. Compression is cheap. So cap the width once, compress hard, and shrink further only if still over target.
MAX_WIDTH is the one value worth measuring rather than guessing. Open the page, inspect the rendered image, and read its actual displayed width at the largest breakpoint. That number, not the number you assume, is what belongs here. Set it too low and images blur on retina displays. Set it too high and you leave most of the savings on the table.
On palette: true: quantization reduces a PNG to 256 colours. On logos, icons and flat illustrations it is close to free. On photographic PNGs it bands visibly. If a field mixes both, set PNG_USE_PALETTE = false or split the run.
Uploading as a new asset
Webflow’s asset upload is a two-step handshake. You register metadata with an MD5 hash, Webflow returns a presigned S3 destination, then you POST the actual bytes there.
Why the MD5 hash? De-duplication. If a hash matches a file already on the site, Webflow reuses the existing asset rather than storing a copy. Two consequences: re-running the script with identical settings does not create duplicates, so it is safe to run twice. And you cannot upload a byte-identical file twice under different names.
API uploads are capped at 4 MB.
Re-pointing the CMS field
Carry the alt text. alt: field.alt || null reads alt off the original and writes it back. Omit it and you strip accessibility metadata and image SEO from every item you touch, which costs more than the compression gains.
This stages changes, it does not publish them. Deliberate. Review in the Designer, publish manually. API site publishing is limited to one successful publish queue per minute regardless.
What breaks at scale?
Rate limits. 60 requests per minute per API key on the Data API. Each item costs two Webflow calls: register asset, patch item. The image download and the S3 upload do not count, since neither hits Webflow’s API.
In the run above, 341 items produced roughly 332 Webflow calls across 10.7 minutes. About 31 per minute at concurrency 3 with a 350ms delay. Comfortably under the ceiling.
Do not read that as safe. Network latency was doing the throttling, not the code. On a faster connection, or at concurrency 5, the same script would hit 429s. A naive script has no retry, so rate-limited items throw, log as errors, and get silently skipped.
The script above handles this in its webflowFetch wrapper. It reads x-ratelimit-remaining from every response and pauses when the remaining budget drops below ten, with a random jitter added so parallel workers do not all resume in lockstep. Any 429 that still slips through is retried with escalating backoff rather than thrown away. Fixed sleeps are guesses; the header is a fact.
Old assets accumulate. Every optimised image leaves its original in the Assets panel. After 164 items you have 164 orphans. They serve no traffic and cost no bandwidth, but they clutter. Clean up after verifying.
Running either approach safely
Native tool:
- Back up the site. Conversion is irreversible and backup restore is the documented recovery path.
- Download originals of anything you may need in source format.
- Identify every field feeding an og:image. If you cannot exclude it, do not run the CMS tool. Add a separate og:image field first.
- Do not close the Designer mid-conversion.
- Convert very large images individually, per Webflow’s recommendation.
- Republish afterwards.
API script:
- Dry run first. Write optimised files locally instead of uploading, open twenty and look at them. Artefacts are obvious to a human and invisible to a script.
- Cap the first live run at 20 items. Publish, check the site, then remove the cap.
- Log everything to CSV. Status, before size, after size, new asset ID, notes, timestamp. Every number in this article came from that log.
- Log skips as loudly as successes.
- Verify before publishing. Staged changes are your safety margin.
- Never hardcode the token.
What I would change about the script
Config profiles per field. A logo field and a thumbnail field want different widths, thresholds and palette settings. One set of constants across all fields produces bad results on at least one.
A render-width guard. Before processing, assert the field renders at a fixed width. If it does not, refuse to run rather than trade srcset for bytes. The mistake easiest to make and hardest to notice.
Frequently asked questions
Does Webflow have bulk image compression?
Yes. Site assets from the Assets panel, CMS assets from the Collections panel under more options, Compress assets. Both convert JPEG, JPG and PNG to AVIF or WebP, capped at 100 assets per request and 10 requests per minute.
Can I compress a Webflow image without changing its format?
No. Webflow’s compression tool is a format conversion tool. The only outputs are AVIF and WebP. Keeping PNG as PNG or JPEG as JPEG while reducing file size requires the Data API or optimising before upload.
Can I compress just one CMS field in Webflow?
No. The CMS compression tool converts all assets in all fields of all collections. Per-field targeting requires the Data API.
Does Webflow’s compression tool resize images?
No. It converts format only. An oversized image becomes a smaller file at identical pixel dimensions. Fixing dimensions means re-uploading correctly sized images or scripting it through the API.
Can I undo Webflow image compression?
No. Converted assets replace originals and cannot be converted back in Webflow. Recovery means restoring a site backup that predates the conversion.
Will compressing images break my social media previews?
It can. Webflow’s documentation states AVIF and WebP are not supported for Open Graph images and strongly recommends against converting them. On most blogs the featured image field is the og:image, so the CMS tool converts it along with everything else.
How do I protect my Open Graph images and still use the native tool?
Add a dedicated og:image field to the collection, populate it with unconverted JPEGs, point your Open Graph settings at that field, then run the compression tool.
Can I replace an existing Webflow asset’s file via the API?
No. The Data API has no replace-file endpoint. Every optimisation creates a new asset that you point the CMS field at. The Designer API’s setAssetFile only runs in an open Designer session, which rules it out for batch work.
Do images uploaded through the Webflow API get responsive variants?
No. srcset and sizes are generated only for images uploaded through the Assets panel or a CMS image field. API and CSV uploads do not get variants.
Why do some assets fail to convert?
Per Webflow, an asset that fails may already be compressed as much as possible. Fully compressed files cannot be converted further.
Does it cost anything to bulk compress Webflow images?
No. The native tool is included in your Webflow plan. The scripted alternative is also free: Node and sharp are open source, and the script runs on your own computer. The only paid option is a third-party optimisation service, which you would choose for continuous optimisation rather than a one-time cleanup.
Do my images get uploaded to a third-party service?
Not with either approach described here. The native tool processes on Webflow’s servers. The script downloads from Webflow, processes locally on your machine, and uploads back. Nothing new sees your images.
What permissions does the API token need?
Four scopes: cms:read, cms:write, assets:read and assets:write. A token missing assets:write fails at the upload step after doing all the download and compression work first.
How do I find my Webflow Site ID and Collection ID?
Your Site ID is the first path segment in any of your asset URLs, structured as cdn.prod.website-files.com/{site-id}/{asset-id}_filename.png. It also appears in site settings. The Collection ID is in the collection’s settings in the CMS panel. You also need the image field’s slug, which is visible in the field settings and is not the same as its display name.
Is there a size limit?
API uploads must be under 4 MB.
Key takeaways
- Webflow’s bulk compression works and reduces file size meaningfully. The constraint is not quality, it is control.
- Compression is coupled to format conversion. There is no compress-and-keep-format option.
- The CMS tool has no field scoping. All fields, all collections, one action.
- Those two limits compound: because your featured image field is usually your og:image, and Webflow warns against converting Open Graph images, the CMS tool cannot be run safely on a standard blog collection.
- Format conversion does not reduce pixel dimensions, which is often where the real waste sits.
- The Data API solves all of this at the cost of responsive variants. Use it only where render width is fixed and known.
- The scripted route is free and local. No subscription, no vendor, and your client’s images never leave your machine.
- Guard against regressions. Four of 164 images in a real run came out larger.
- Check before you act. Half the collection needed nothing.
- Get your Site ID, Collection ID, image field slug and a four-scope token before you start. The field slug is the one that breaks people, because a wrong slug fails silently.
Related reading
- See our guide on Webflow bandwidth costs for how heavy CMS images compound into plan-level overages.
- If your plan is already at the Webflow pricing tier limits, reducing image weight buys you headroom before an upgrade.
- Migrating a large content library? See our WordPress to Webflow migration guide for how collections get heavy in the first place.